善恶众相

  • 首页

  • 分类

  • 归档

OC运行时源码细节

发表于 2015-07-10 更新于 2019-08-07 分类于 iOS
介绍应用中的Objective-C类是如何被加载进内存的,以及在加载进内存过程中是基于什么结构去组织类与类之间关系的

之前的一篇文章简略的介绍了objc runtime的在程序启动之前都做了哪些事情,接下来我们深入到细节中看看,应用链接库中的类及应用本身定义的类被映射进内存并建立关联的过程以及objc是通过什么结构去管理类之间的这种复杂联系的。

内存映射

编译链接过程:

编译器根据代码生成可执行文件(Windows平台下为PE文件格式、Linux平台下为ELF文件格式、Mac平台下为Mach-O文件格式)的过程,每一种可执行文件格式都有其特定的文件结构,Mach-O文件格式请参阅这篇文章,其他平台的可执行文件格式与Mach-O类似,特定segment及其section都有着特定的含义,但是无论哪个平台的可执行文件格式其文件中肯定会包含data,text,stack等segment。Mach-O与其他平台可执行文件格式不同之处在于:

OBJC2.0之前:

编译器专门为Objective-C类及方法在Mach-O可执行文件中开辟了一个叫做__OBJC的segment,其中包含了一切与Objective-C语言相关的类信息,包括类库和应用重定义的类。

OBJC2.0之后:

编译器将这些跟Objective-C语言相关的信息存储到了__TEXT和__DATAsegment中,名称为于__objc_classname,__objc_methname,__objc_classlist,__objc_imageinfo等的section中,其中__objc_imageinfosection中记录着应用(应用的可执行文件并不是xxx.app文件,而是xxx.app文件目录下的xxx文件)执行所需要链接的库信息(lib/framework),__objc_classlistsection中记录着本应用中声明的类信息。

程序执行过程

对于Mac/iOS系统执行程序时,首先从Mach-O文件中读取framework和应用中定义的类信息,然后对这些类建立connection,最终会存储在一个全局的(extern)NSMapTable结构中,名称为class_hash,等待代码运行时去使用已经建立connection的类。

在OBJC2.0之前:

详见objc-file-old.mm文件中宏定义:

1
2
3
4
5
6
7
8
9
#define GETSECT(name, type, sectname)                                   \
type *name(const header_info *hi, size_t *outCount) \
{ \
unsigned long byteCount = 0; \
type *data = (type *) \
getsectiondata(hi->mhdr, SEG_OBJC, sectname, &byteCount); \
*outCount = byteCount / sizeof(type); \
return data; \
}

表明类的信息是从SEG_OBJC即为__OBJC segment中读取得到的。

而在OBJC2.0之后:

详见objc-file.mm文件中的宏定义

1
2
3
4
5
6
7
8
9
#define GETSECT(name, type, sectname)                                   \
type *name(const header_info *hi, size_t *outCount) \
{ \
unsigned long byteCount = 0; \
type *data = (type *) \
getsectiondata(hi->mhdr, SEG_DATA, sectname, &byteCount); \
*outCount = byteCount / sizeof(type); \
return data; \
}

表明类的信息是从SEG_DATA即为__DATAsegment中读取得到的。

细心地朋友肯能会发现在objc-runtime-old.mm文件中有这样一段注释,他的大概意思是:

  1. 当images被加载完成(在程序启动或其他情况下),runtime需要从中加载classes和categories,将classes与superclasses建立关联,categories与parent classes建立关联,然后调用+load方法。
  2. runtime可以以任意顺序对classes进行处理,也就是说,runtime可能先于superclasses发现class,为了处理这种无序的class加载顺序,runtime建立了一种”pending class”机制。
  3. 一个class在image中第一次被发现时被视为”unconnected”,它被存储在unconected_class_hash中。如果该class的所有superclass都存在并且已经被”connected”,这个新的class可以被connected进他的superclasses并被移到class_hash中以便被使用。否则该class会一直被存储在unconnected_class_hash中知道superclasses完成connecting。
  4. image mapping并”不是当前线程安全”的操作,它会在一些情况下被重新执行那个:superclass找到了一些引起ZeroLink的原因时回去加载另一个image,或者调用+load的方法时dyld会去加载另一个image。

image mapping 顺序为:

  1. 读取images中所有的classes
  2. 读取images中所有的categories
  3. 对所有classes建立connection
  4. 处理selector和class的引用计数
  5. 修复images中所有protocol对象
  6. 调用+load方法

详见:

1
2
3
4
5
6
7
8
9
10
11
12
13
14
15
16
17
18
19
20
21
22
23
24
25
26
27
* Read all classes in all new images. 
* Add them all to unconnected_class_hash.
* Note any +load implementations before categories are attached.
* Attach any pending categories.
* Read all categories in all new images.
* Attach categories whose parent class exists (connected or not),
* and pend the rest.
* Mark them all eligible for +load (if implemented), even if the
* parent class is missing.
* Try to connect all classes in all new images.
* If the superclass is missing, pend the class
* If the superclass is unconnected, try to recursively connect it
* If the superclass is connected:
* connect the class
* mark the class eligible for +load, if implemented
* fix up any pended classrefs referring to the class
* connect any pended subclasses of the class
* Resolve selector refs and class refs in all new images.
* Class refs whose classes still do not exist are pended.
* Fix up protocol objects in all new images.
* Call +load for classes and categories.
* May include classes or categories that are not in these images,
* but are newly eligible because of these image.
* Class +loads will be called superclass-first because of the
* superclass-first nature of the connecting process.
* Category +load needs to be deferred until the parent class is
* connected and has had its +load called.

建立Classes之间的连接

从images中读取classes后需要构建classes之间的关系网,而构建这一关系网的基础结构是NXMapTable和NXHashTable,熟悉这两个结构及其操作函数有助于我们对构建classes之间connection关系部分代码的理解。根据名称我们可以明显的看出这两个结构是基于hash表结构构建的。NXMapTable与NXHashTable结构及其操作函数详见项目代码Gitub。

NXHashTable

结构体如下:

1
2
3
4
5
6
7
8
9
10
11
12
13
14
15
16
17
18
19
20
21
22
23
24
25
26
27
28
29
30
31
32
33
34
35
36
37
38
39
40
41
42
43
44
45
/**
* hash :决定了获取节点index的计算规则
* isEqual :用于判断两个节点是否相同
* free :用于释放节点
*/
typedef struct {
uintptr_t (*hash)(const void *info, const void *data);
int (*isEqual)(const void *info, const void *data1, const void *data2);
void (*free)(const void *info, void *data);
int style; /* reserved for future expansion; currently 0 */
} NXHashTablePrototype;

/**
* 下面是hash结构体
* prototype :hash函数表
* count :hash结构已经有的key个数
* nbBuckets :hash表的容量大小,随count增多而改变
* 出于查找效率的考虑? 当count > nbBuckets时会通过_NXHashRehash函数进行扩扩容
* buckets :hash表的数组基址
*/
typedef struct {
const NXHashTablePrototype *prototype;
unsigned count;
unsigned nbBuckets;
void *buckets;
const void *info;
} NXHashTable;

/**
* 为了提高效率,使用以下结构
* 当只有一个元素的时候 one就指代data的值
* 当有多于一个元素的时候 就需要通过遍历many数组 来获取data的值
*/
typedef union {
const void *one;
const void **many;
} oneOrMany;

/**
* hash表的元素,存储着具有相同hash值的所有key
*/
typedef struct {
unsigned count;
oneOrMany elements;
} HashBucket;

重点的宏定义的理解:

1
2
3
4
5
6
7
8
9
10
11
12
13
14
15
16
17
18
19
20
21
22
/*  BUCKETOF是一个宏,它返回指定data值经过hash后的数组地址
主要分三步:
1.(*table->prototype->hash)(table->info,data)表示调用具体hash表的函数表的hash函数。对于ptr型的实际调用是NXPtrHash函数。
2.((*table->prototype->hash)(table->info,data) % table->nbBuckets) 表示将得到的hash值进行求余,以对应于hash桶的索引。
3.(((HashBucket*)table->buckets)+((*table->prototype->hash)(table->info, data) %table->nbBuckets))表示将索引加上基地址buckets,即时对应的data散列到的HashBucket数组中
*/
#define BUCKETOF(table, data) (((HashBucket *)table->buckets) + ((*table->prototype->hash)(table->info, data) % table->nbBuckets))
/* GOOD_CAPACITY返回恰当的buckets的容量大小,初始化函数NXCreateHashTableFromZone中会用到,比如:
* c值 返回值
* 0-1 1
* 2-3 3
* 4-7 7
* 8-15 15
* 16-31 31
* 32-63 63
* 64-127 127 ...
**/
#define GOOD_CAPACITY(c) (exp2m1 (log2u (c)+1))
/*
* MORE_CAPACITY根据当前容量返回扩容后的容量大小,在扩容函数_NXHashRehash中会用到
**/
#define MORE_CAPACITY(b) (b*2+1)

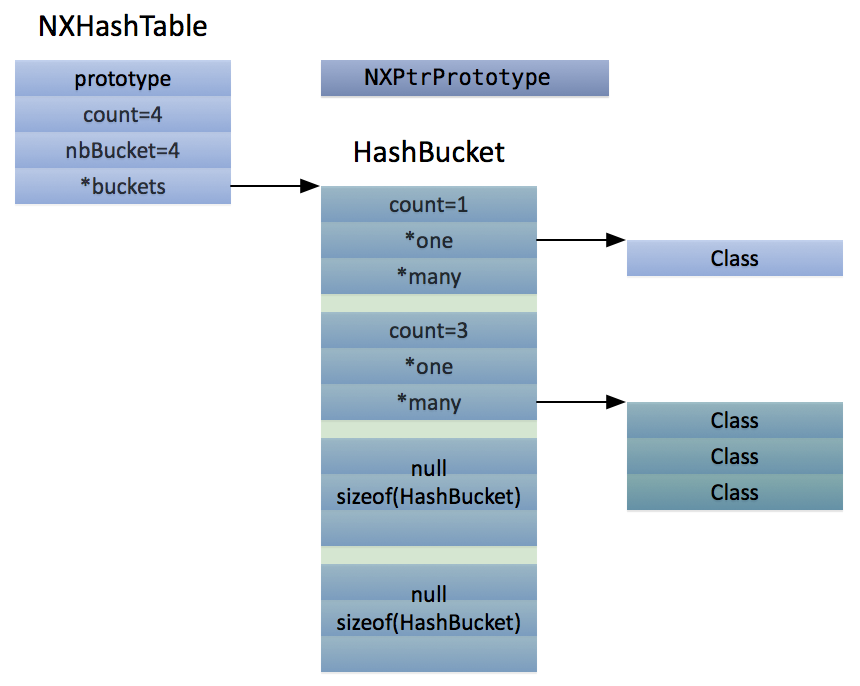
NXHashTable数据操作的内存布局如下图:

注意:
在NXHashTable结构中

  1. prototype的hash函数决定了index的获取规则分为通过指针获取还是字符串获取,NXHashTable中的hash函数的参数一般式指针即(Ptr)
  2. count代表存储的HashBucket的数量
  3. nbBucket代表bucket容量的大小一般为2^n-1
  4. bucket指向存储HashBucket的数组的指针

在HashBucket结构中

  1. count代表该HahsBucket结构存储元素的数量
  2. 当存储一个元素时直接存储到void *one中,当存储多于一个元素时存储到void **many代表的二维数据中
NXMapTable

NXMapTable与NXHashTable不同之处在于,NXMapTable的buckets指向存储MapPair结构的数组,即:

1
2
3
4
typedef struct _MapPair {
const void *key;
const void *value;
} MapPair;

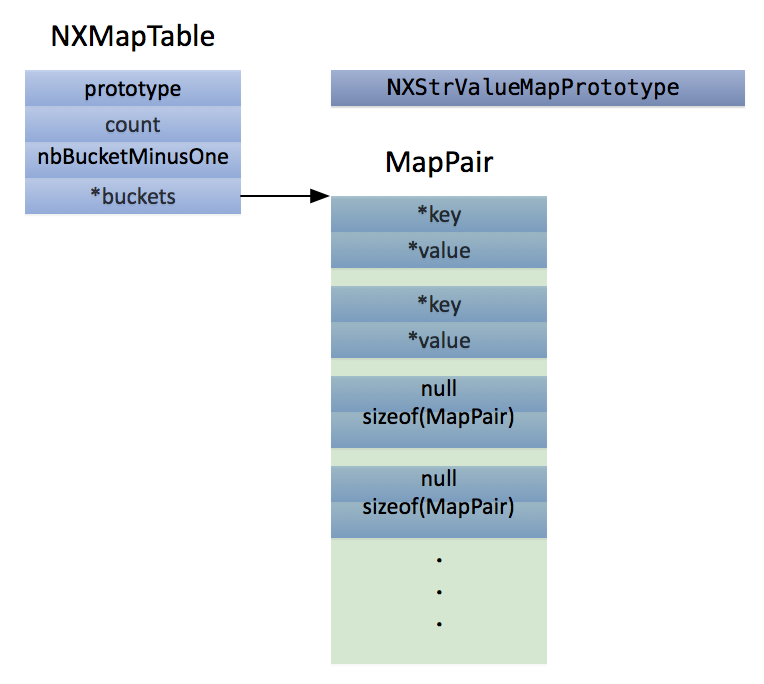
NXMapTable数据操作的内存布局如下图:

注意:
在NXMapTable中

  1. pototype的hash函数决定了index的获取规则分为通过指针获取还是字符串获取,NXMapTable中的hash函数的参数一般式字符串(Str)
  2. count代表存储的MapPair的数量
  3. nbBucketMinusOne代表bucket容量的大小一般为2^n-1
  4. buckets指向存储MapPair的数组的指针

在MapPair中

  1. key一般代表指向str的指针,所以该结构一般用于存储有名称的对象,如selctor,class,protocol等
  2. value一般存储与key存储的字符串相关联的结构体.
metaclass的理解
1
2
3
4
5
6
7
8
9
10
11
12
13
14
15
/** 
* 创建一个新的类和元类.
*
* @param superclass 新创建class的superclass,如果传Nil则会创建一个新的root class.
* @param name 新创建的class的名称,该字符串将被深拷贝.
* @param extraBytes class和metaclass对象末尾的ivars索引所需要的内存大小,一般设置为0.
*
* @return 返回新的class或Nil(如:name属性已经被占用).
*
* @note 可以通过object_getClass(newClass)方法获取指向新创建的metaclass的指针.
* @note 想创建新的类需要调用objc_allocateClassPair.然后通过class_addMethod和class_addIvar设置class的属性和方法(协议).
* 当已经创建了新的class,调用objc_registerClassPair方法将class和metaclass添加到全局的哈希结构中,以供调用.
* @note 实例方法和实例变量应该添加到实例的类中;类方法应该添加到metaclass中.
*/
Class objc_allocateClassPair(Class superclass, const char *name, size_t extraBytes)
OC运行时源码概览
视图,层和动画
  • 文章目录
  • 站点概览
Zrongl

Zrongl

23 日志
3 分类
GitHub E-Mail
  1. 1. 内存映射
  2. 2. 建立Classes之间的连接
    1. 2.1. NXHashTable
    2. 2.2. NXMapTable
    3. 2.3. metaclass的理解
© 2019 Zrongl
不争无尤
|
主题 – NexT.Mist v7.3.0
0%